

Express Checkout HTML Guide
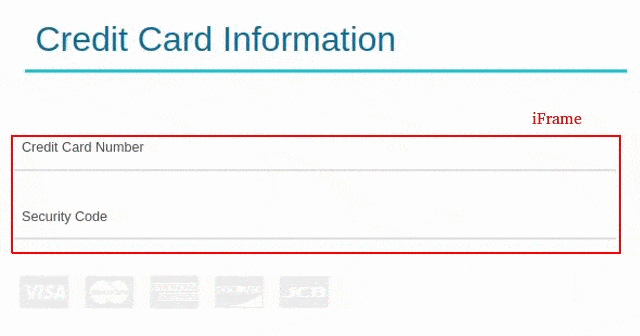
The hostedPCI Express Checkout solution is designed to integrate with any ecommerce site that requires credit card and CVV information capture. The express checkout solution uses an iframe module that is installed on the main ecommerce sites payment pages. The iframe only displays the credit card fields which are in scope for PCI compliance, that is the credit card number and CVV field. The rest of the page is presented by the ecommerce application as usual.
The iframe module is designed to use the main ecommerce sites payment form to submit credit card information to hostedPCI and have hostedPCI return the credit card token back to the ecommerce application. Creating the token through hostedPCI is the first step to maintaining a PCI compliant environment using the HostedPCI toolset.
Backend processing of the HPCI token is described in Checkout Web Services API Guide
Key Terms
| VARIABLE | DESCRIPTION |
|---|---|
| hpciSiteId | The site id (a number) configured and provided by HPCI after the activation of the HPCI account. There will be a different Site Id for staging and live sites. |
| location | The location reference within the HPCI application. Locations are configured through the HPCI customer portal. |
| fullParentHost | Is the full hostname where the parent ecommerce site resides (not the iframe). |
| fullParentQStr | Is the query string currently used by the payment page where the iframe resides. This parameter is required for backward compatibility with browsers that do not support “post” frame messages. This string has to match the current url that appears on the browser address bar. |
| jqVersion | This setting is optional, allows control on the JQuery version of the iFrame that is being used. Available versions are 1.11.2 or 2.1.3 or 1.4.1. Values can be [jq1 | jq2 | jqdef] respectively. This parameter need the V2 iFrame to be enabled in order for it to work. |
| browserType | This setting is optional, sets the iFrame for mobile or desktop use. Values can be [mobile | def] |
| cvvValidate | Set the value of the parameter to Y if basic CVV form validation is required. Basic validation will report an error if the entered value is not numbers only and is not between 3 and 4 characters regardless of credit card type. |
| reportCCType | Set the value of the parameter to Y if preliminary credit card and CVV data needs to be reported once the user has entered the details and moves the focus from the respective fields. Credit card type, credit card and CVV length and credit card validity using Mod 10 check is reported. |
| reportCCDigits | This function is optional and requires iFrame V2 to be enabled on the account. This function enables key press feedback from the ccNum field within the iFrame. Set to Y if CC data needs to be reported back during key press. |
| formatCCDigits | Credit card formatting feature, automatically add delimiter while customer types the card in, for example “4444333322221111” will be turned to “4444-3333-2222-1111”. Turn on or off [Y/N]. |
| formatCCDigitsDelimiter | Credit card formatting feature, set the delimiter value which can be space, dash or tab, just need to remember that the value has to be URL encoded [%20/-/%09]. |
| reportCVVDigits | This function is optional and requires iFrame V2 to be enabled on the account. This function enables key press feedback from the ccCVV field within the iFrame. Set to Y if CVV data needs to be reported back during key press. |
| hpciCCFrameName | The name of the iframe used for displaying the credit card entry fields. |
| hpciSiteSuccessHandler | The reference to the function that handles successful credit card mapping. This function will typically copy the mappedCCValue, mappedCVVValue parameter values to form hidden fields that need to contain the credit card and CVV values respectively. Finally this function should submit the order processing form that encloses the credit card entry fields. |
| hpciSiteErrorHandler | The reference to the function that displays the credit card mapping errors. Typically the following function uses DHTML/DOM to display the error. |
| hpci3DSitePINSuccessHandler | This function is optional and needs to be implemented only for sites that use 3D Secure functionality. The reference to the function that handles successful PIN validation. This function will typically submit the order processing form that encloses the credit card entry fields and the PIN validation iFrame. |
| hpci3DSitePINErrorHandler | This function is optional and needs to be implemented only for sites that use 3D Secure functionality. The reference to the function that displays the PIN validation errors. Typically the following function uses DHTML/DOM to display the error. |
| hpciCCPreliminarySuccessHandler | This function is optional and needs to be implemented only for sites that use reportCCType functionality. The function signature should accept credit card type, BIN, validity flag and length in that order. |
| hpciCVVPreliminarySuccessHandler | This function is optional and needs to be implemented only for sites that use reportCCType functionality. The function signature should accept CVV length. |
| hpciCCDigitsSuccessHandler | This function is optional and requires iFrame V2 to be enabled on the account and needs to be implemented for sites that use key press functionality. The function signature should accept credit card type, BIN, validity flag and length in that order. |
| hpciCVVDigitsSuccessHandler | This function is optional and requires iFrame V2 to be enabled on the account and needs to be implemented for sites that use key press functionality. The function signature should accept CVV length. |
| sendHPCIChangeClassMsg | This function is optional and requires iFrame V2 to be enabled on the account and needs to be implemented for sites that require changes to the class of the fields inside the iFrame based on interactive feedback during customer keypress of CC/CVV data. The function signature expects elementId of ccNum/ccCVV from within the iFrame and replaces the class with the new classValue that can correspond to the classes from the style header of the iFrame. |
| enableTokenDisplay | Set to “Y” if you want the iFrame to show pre-populated masked value that is stored inside. It applies to both credit card and CVV fields. If it’s not empty, it means there is already a value stored inside. |
| ccNumTokenIdx | This parameter is used to define which iFrame index is going to be used. Used mainly for instances where you would need to load multiple iFrames on the same page. Set to “1” unless there is a need for multiple iFrames on the same page. Required for CVV only iFrame. |
| ccNumToken | Is the credit card token that is associated with the CVV iFrame. To re-tokenize CVV for token 4111-1111-1111-1111 set this parameter to “4111111111111111”. |
Installing the iFrame
The HostedPCI iFrame can be installed in a few different ways, the first would be the basic iFrame model with the CVV. This version of the iframe is basic in functionality, the iFrame V2 version is the second generation iFrame the difference with this iFrame allows companies to use keystroke feedback capabilities which can provide you customer with an idea of if they missed a digits or added a digits, the keystroke feedback also as the ability select the card type based on the first 4 digits of the PAN number. With the HostedPCI iFrame you also have the ability to set a CVV only iFrame or a credit card PAN only iFrame depending on your business needs.
Iframe Prerequisites
In order to install the iFrame and have it communicate with the main eCommerce payment form, some prerequisite JavaScript is required.
Required JavaScript Includes
<script src="https://ccframe.hostedpci.com/WBSStatic/site60/proxy/js/hpci-cciframe-1.0.js" type="text/javascript" charset="utf-8"></script>
<script src="https://ccframe.hostedpci.com/WBSStatic/site60/proxy/js/jquery.ba-postmessage.2.0.0.min.js" type="text/javascript" charset="utf-8"></script>
Optional JavaScript Includes
<script src="https://ccframe.hostedpci.com/WBSStatic/site60/proxy/js/jquery-1.4.1.min.js" type="text/javascript" charset="utf-8"></script>
JavaScript in <HEAD> Section
<script>
var hpciCCFrameHost = "https://ccframe.hostedpci.com";
var hpciCCFrameFullUrl = "https://ccframe.hostedpci.com/iSynSApp/showPxyPage!ccFrame.action?pgmode1=prod&locationName=[location]&sid=[hpciSiteId]&reportCCType=[Y]&reportCCDigits=[Y]&formatCCDigits=Y&formatCCDigitsDelimiter=%09&reportCVVDigits=[Y]&fullParentHost=[ecommerceSiteHostName]&fullParentQStr=[ecommerceURLQueryString]&pluginMode=[jqVersion]&clientType=[browserType]";
var hpciCCFrameName = "ccframe"; // use the name of the frame containing the credit card
var hpciSiteErrorHandler = function (errorCode, errorMsg){
// Place the following alert to properly display the error message
alert("Error while processing credit card code:" + errorCode + "; msg:" + errorMsg);
}
var hpciSiteSuccessHandlerV4 =
function(hpciMappedCCValue, hpciMappedCVVValue, hpciCCBINValue, hpciGtyTokenValue, hpciCCLast4Value, hpciGtyTokenAuthRespValue, hpciTokenRespEncrypt){
// Please pass the values to the document input and then submit the form
// name of the input (hidden) field required by ecommerce site
// Typically this is a hidden input field.
var ccNumInput = document.getElementById("ccNum");
ccNumInput.value = hpciMappedCCValue;
// name of the input (hidden) field required by ecommerce site
// Typically this is a hidden input field.
var ccCVVInput = document.getElementById("ccCVV");
ccCVVInput.value = hpciMappedCVVValue;
// name of the input (hidden) field required by ecommerce site
// Typically this is a hidden input field.
var ccBINInput = document.getElementById("ccBIN");
ccBINInput.value = hpciCCBINValue;
// name of the form submission for ecommerce site
var pendingForm = document.getElementById("CCAcceptForm");
pendingForm.submit();
}
var hpci3DSitePINSuccessHandler = function (){
// Name of the form submission for ecommerce site
var pendingForm = document.getElementById("CCAcceptForm");
pendingForm.submit();
}
var hpci3DSitePINErrorHandler = function (){
// Adapt the following message / action to match your required experience
alert("Could not verify PIN for the credit card");
}
var hpciCCPreliminarySuccessHandlerV2 = function(hpciCCTypeValue, hpciCCBINValue, hpciCCValidValue, hpciCCLengthValue, hpciCCEnteredLengthValue);){
// Adapt the following message / action to match your required experience
alert("Received preliminary credit card details");
}
var hpciCVVPreliminarySuccessHandlerV2 = function(hpciCVVLengthValue, hpciCVVValidValue);{
// Adapt the following message / action to match your required experience
alert("Received preliminary CVV details");
}
var hpciCCDigitsSuccessHandlerV2 = function(hpciCCTypeValue, hpciCCBINValue, hpciCCValidValue, hpciCCLengthValue, hpciCCEnteredLengthValue) {
// Use to enable credit card digits key press
alert("Received CC keypress");
}
var hpciCVVDigitsSuccessHandler = function(hpciCVVDigitsValue) {
// Use to enable CVV digits key press
alert("Received CVV keypress");
}
</script>
Basic iFrame
In order to install the HostedPCI iFrame, you will need to place the code below where the credit card field will be in your checkout process.
<iframe id="ccframe" src="https://ccframe.hostedpci.com/iSynSApp/showPxyPage!ccFrame.action?pgmode1=prod&locationName=[Location]&sid=[hpciSiteId]&fullParentHost=[ecommerceSiteHostName]&fullParentQStr=[ecommerceURLQueryString]" onload="receiveHPCIMsg()" name="ccframe" width="480" height="52" frameborder="0" scrolling="NO">
If you can see this, your browser doesn't understand IFRAME.</iframe>
You can omit onload=”receiveHPCIMsg()” call if preliminary messages are not required.
If the primary eCommerce site has checkout page URL where HPCI iFrame is displayed as ( https://checkout.myecommercesite.com/MyApp/checkout.asp?param1=value1 ) and if the location name is checkout1 and HCPI site ID is 400001, then HPCI iFrame URL will be as follows:
*Other iframe parameters such as width, height and borders are adjustable as required for the implementation.
https://ccframe.hostedpci.com/iSynSApp/showPxyPage!ccFrame.action?pgmode1=prod&locationName=checkout1&sid=400001&fullParentHost=https%3A%2F%2Fcheckout.myecommercesite.com&fullParentQStr=%2FMyApp%2Fcheckout.asp%3Fparam1%3Dvalue1
Key Parameters
| hpciSiteId | Is the site id (a number) configured and provided by HPCI after the activation of the HPCI account. There will be a different Site Id for staging and live sites. |
| Location | Is the location reference within the HPCI application. Locations are configured through the HPCI customer portal. |
| fullParentHost | Is the full hostname where the parent ecommerce site resides (not the iframe). |
| fullParentQStr | Is the query string currently used by the payment page where the iframe resides. This parameter is required for backward compatibility with browsers that do not support “post” frame messages. This string has to match the current url that appears on the browser address bar. |
Interactive iFrame
The interactive iFrame is the second generation of the HostedPCI iFrame. The customer can now receive prompts and feedback during keypress of CC/CVV data directly into the iFrame by changing the class. It also allows to prompt the customer for which credit card type is being used during keypress.
The Interactive iFrame will be implemented the same way as the Basic iFrame. In order to use the full function of the interactive iFrame there are some additional parameters that need to be added to the iFrame URL, as well as a small change on the back end.
<iframe id="ccframe" src="https://ccframe.hostedpci.com/iSynSApp/showPxyPage!ccFrame.action?pgmode1=prod&locationName=[Location]&sid=[hpciSiteId]&reportCCType=Y&reportCCDigits=Y&reportCVVDigits=Y&formatCCDigits=Y&formatCCDigitsDelimiter=%09&fullParentHost=[ecommerceSiteHostName]&fullParentQStr=[ecommerceURLQueryString]" onload="receiveHPCIMsg()" name="ccframe" width="480" height="52" frameborder="0" scrolling="NO">
If you can see this, your browser doesn't understand IFRAME.</iframe>
3 types of Card# Format


Key Parameters
| reportCCType | Requires iFrame V2 to be enabled on the account. This function enables key press feedback for the credit card type within the iFrame. Set to Y if CC data needs to be reported back during key press. |
| reportCCDigits | Requires iFrame V2 to be enabled on the account. This function enables key press feedback from the ccNum field within the iFrame. Set to Y if CC data needs to be reported back during key press. |
| reportCVVDigits | Requires iFrame V2 to be enabled on the account. This function enables key press feedback from the ccCVV field within the iFrame. Set to Y if CVV data needs to be reported back during key press. |
| formatCCDigits | Credit card formatting feature, automatically add delimiter while customer types the card in, for example “4444333322221111” will be turned to “4444-3333-2222-1111”. Turn on or off [Y/N]. |
| formatCCDigitsDelimiter | Credit card formatting feature, set the delimiter value which can be space, dash or tab, just need to remember that the value has to be URL encoded [%20/-/%09]. |
| hpciCCDigitsSuccessHandlerV2 | This parameter needs to be set on the Host Page in order to utilize the keystroke feedback. |
Credit Card Field Only iFrame
The HostedPCI Basic and Interactive iFrame can be loaded with the credit card field only for companies who do not want to collect the CVV number. In order to accomplish Credit Card Only iFrame, you would need to hide the CVV field within the iFrame body styling management section. It is important to not delete the CVV field from the iFrame since it will break the functionality of the iFrame, instead you will hide the field from being visible on your checkout page.
In order to implement the credit card only iFrame the information below needs to be inserted within the iFrame body styling section.
Note: When installing the credit card only iFrame it is important to hide the CVV field instead of removing the it completely. If the CCV field is removed the iFrame code will break without this field.
<body class="account" id="updatecc" style="line-height: 1;color: rgb(68,68,68);font-size: 16.0px;font-family: tahoma;"><table align="center" class="cc_info" height="111" width="455">
<tbody>
<tr>
<td>
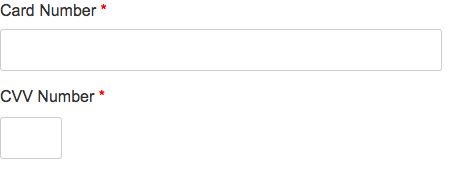
<div align="left"><font size="4"><label for="ccNum" style="font-weight: normal;"> Card Number</label></font><br /></div>
<div align="left"><input id="ccNum" name="ccNum" style="border-width: thin;border-style: solid;border-radius: 0.2em;padding: 4.0px;width: 275.0px;height: 30.0px;" type="text" /></div>
</td>
</tr>
<tr>
<td>
<div align="left"><strong><br /></strong></div>
<div align="left"><input id="ccCVV" name="ccCVV" style="border-width: thin;border-style: solid;border-radius: 0.2em;padding: 2.0px;width: 90.0px;height: 30.0px;" type="hidden" /></div>
</td>
</tr>
</tbody>
</table></body>
CVV only iFrame
In some cases, it may be useful to be able to load an iFrame that will contain only the CVV field. That iFrame will be associated to an existing token.
For example, a credit card token is valid for 18 months after the last time it was used, where as CVV token is only valid for 20 minutes. If we would like to bill a token that is already saved in the system, but we also want to pass the CVV along with it and it’s been more than 20 minutes, we would need to load a CVV only iFrame that will re-tokenize the CVV to an existing credit card token.
Note: When installing the CVV only iFrame it is important to hide the credit card field instead of removing the it completely. If the credit card field is removed the iFrame code will break without this field
https://ccframe.hostedpci.com/iSynSApp/showPxyPage!ccFrame.action?pgmode1=prod&locationName=checkout1cvvonly&sid=400001&enableTokenDisplay=Y&ccNumTokenIdx=1&ccNumToken=4000000000000001&fullParentHost=[ecommerceSiteHostName]&fullParentQStr=[ecommerceURLQueryString]
Sample Code:
<body class="account" id="updatecc">
<div class="cc_info">
<fieldset class="cc form-group">
<input id="ccNum" name="ccNum" type="hidden" value="" />
</fieldset>
<fieldset class="cc form-group">
<label class="cc" for="ccCVV">CSC/CVV</label> <input id="ccCVV" name="ccCVV" type="text" value="" />
</fieldset>
</div>
</body>
Key Parameters
| enableTokenDisplay | Set to “Y” if you want the iFrame to show pre-populated masked value that is stored inside. It applies to both credit card and CVV fields. If it’s not empty, it means there is already a value stored inside. |
| ccNumTokenIdx | This parameter is used to define which iFrame index is going to be used. Used mainly for instances where you would need to load multiple iFrames on the same page. Set to “1” unless there is a need for multiple iFrames on the same page. Required for CVV only iFrame. |
| ccNumToken | Is the credit card token that is associated with the CVV iFrame. To re-tokenize CVV for token 4111-1111-1111-1111 set this parameter to “4111111111111111”. |
Multiple iFrames
In some instances, it may be useful to be able to load multiple iFrames on the same page. For example, if there is a requirements to split payment into multiple credit cards. Another example would be for an agent to have multiple iFrames available to him on a single page load. This way there is no need to reload the page to select a different customer/credit card.
https://ccframe.hostedpci.com/iSynSApp/showPxyPage!ccFrame.action?pgmode1=prod&locationName=checkout1&sid=400001&ccNumTokenIdx=1
Key Parameters
| locationName | Is the iFrame location reference within the HPCI application. Locations are configured through the HPCI customer portal. |
| sid | Is the site id (a number) configured and provided by HPCI after the activation of the HPCI account. There will be a different Site Id for staging and live sites. |
| ccNumTokenIdx | This parameter is used to define which iFrame index is going to be used. Set to “1” or increment by 1 for every additional iFrame that is required for the same page. |
Checkout Page
Once information is submitted to the iframe, a credit card token will be returned from the HPCI iframe back to the main form hosted on the parent page. Information will automatically be placed into a form hosted on the parent page. The following minimum form elements are required:
The ccNum and ccCVV fields are the minimum fields required for the iframe. They are typically not the only fields required for a payment. For example other fields required to process a payment usually consist of the expiry date, billing info and more. The additional fields are usually controlled by the parent page that hosts the iFrame.
ccBIN is an optional field that will display the BIN number of the card.
The action3DSec field is only required if 3D Secure functionality is used. Pass the action value to HPCI API in field pxyThreeDSecAuth.actionName so that credit card enrollment in 3D Secure Service is verified.
The Submit input type is a critical element of the iframe implementation. The JavaScript embedded in the onClick() event will be used to send a message to the iframe, to submit the actual credit card information and return credit card token information back to the main input form. Use the Javascript function sendHPCIMsg() to initiate the mapping and submission process.
<form id="CCAcceptForm" action="https://somepath/MainEcommerceAction" method="post"><input id="ccNum" name="ccNum" type="hidden" value=" " /> <input id="ccCVV" name="ccCVV" type="hidden" value=" " /> <input id="ccBIN" name="ccBIN" type="hidden" value=" " /> <input name="action3DSec" type="hidden" value="verifyenroll" /> <input type="submit" value="Submit" onClick='return sendHPCIMsg();' /></form>
Submitting Information to your Ecommerce Application
Once the iframe returns credit card token information back to the main form the JavaScript provided will submit the main form to the ecommerce application. The token will submitted along with the remainder of the information in the form.
Once the server-side application has the credit card token, all of the credit card operations such as SALE, AUTH, CAPTURE, VOID and CREDIT will be available to the application through the HCPI server side API
please see Web Service API guide
How to Handle Tokens
Tokens can be stored in the ecommerce application database without risk of compromising PCI compliance. Tokens are designed to look similar to credit card numbers in length and structure without actually being valid credit card numbers. The first 4 digits and last 3-4 digits of a token match to those of the corresponding credit card number. Tokens are guaranteed NOT to be MOD-10 compatible.
Modifying iFrame CSS for the Basic iFrame
It may be necessary to update the CSS / Styles within the IFRAME to highlight error fields for example. The following method can be used to initiate style update for an element within the iFrame. This method can be invoked multiple times to update the style parameters within the iFrame.
Please make sure hpci-cciframe-1.0.js file is included from HPCI servers prior to making the following call.
The call signature is as follows: sendHPCIChangeStyleMsg(htmlElementID, cssTagName, cssTagValue);
For example to update text color to red for input element with ID ccNum, use the following parameters: sendHPCIChangeStyleMsg(“ccNum”, “color”, “red”);
Modifying iFrame CSS for the Interactive iFrame
There is another function available to change CSS class at runtime within the iFrame. It is specifically useful to create interactive iFrame experience using the key press functions that were introduced for iFrame V2
The call signature is as follows: sendHPCIChangeClassMsg(elementId, classValue);
For example, to change the class of credit card field inside the iFrame which has the id “ccNum” from the existing class into class “.input-text”, one has to use the following parameters: sendHPCIChangeClassMsg(“ccNum”, “input-text”);
Updating iFrame CSS using Query String Parameters
To use query string parameters to update CSS within the IFRAME, place any of the following place holders in the style tag within the iFrame code:
${pageParam1} / ${pageParam2} / ${pageParam3} / ${pageParam4} / ${pageParam5} / ${pageParam6} / ${pageParam7} / ${pageParam8} / ${pageParam9}
e.g: style="margin: ${pageParam1} auto;background: ${pageParam2} repeat scroll 0 0 white;
To use query string parameters to update CSS within the IFRAME, place any of the following place holders in the style tag within the iFrame code:
https://ccframe.hostedpci.com/iSynSApp/showPxyPage!ccFrame.action?pgmode1=prod&locationName=test1&…….&pageParam1=0&pageParam2=none
The Values passed can not contain “,’,>,<
Installing the iFrame for 3D Secure PIN Validation (Optional)
This iFrame implementation is optional and needs to be implemented only for sites that use 3D Secure functionality. The HPCI PIN Validation iframe can be installed into any form that is required to accept credit card information. This form should be displayed after receiving a response status of “3dsecure” from the HPCI PaymentAuth or PaymentSale call. The returned response should also contain authorization transaction ID. The example below from the “PCI Direct” website shows the credit card PIN validation form within the My Account section of the website.
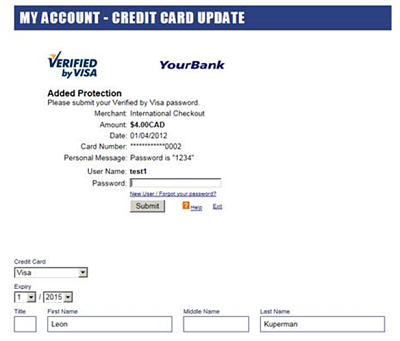
The highlighted top portion of the screen shot show the portion of the page that is delivered through the iframe. The remainder of the form is provided by the ecommerce site itself, all the user entered data along with tokenized credit card and CVV should be populated in the form for resubmission after the PIN validation complete.
To install PIN validation iFrame, the following code should be placed where the credit card fields are required:
<iframe id="threeDSecFrame" name="threeDSecFrame" onload="receiveHPCIMsg()" src="https://ccframe.hostedpci.com/iSynSApp/appUserVerify3DResp!verificationForm.action?sid=[hpciSiteId]&authTxnId=[authTxnId]&fullParentHost=[ecommerceSiteHostName]&fullParentQStr=[ecommerceURLQueryString]" width="450" height="400" frameborder="0" scrolling="NO">
  If you can see this, your browser doesn't understand IFRAME.</iframe>
Key Parameters
| hpciSiteId | Is the site id (a number) configured and provided by HPCI after the activation of the HPCI account. There will be a different Site Id for staging and live sites. |
| authTxnId | is the unique reference provided by 3D Secure enrollment verifcation call. |
| fullParentHost | Is the full hostname where the parent ecommerce site resides (not the iframe). |
| fullParentQStr | Is the query string currently used by the payment page where the iframe resides. This parameter is required for backward compatibility with browsers that do not support “post” frame messages. This string has to match the current url that appears on the browser address bar. |
3D Secure Hidden Field / Form Information
Once information is submitted to the IFRAME and PIN validation is complete, the form is resubmitted to perform the AUTH or SALE operation:
The ccNum and ccCVV fields are pre populated by the ecommerce site from the previous call when the credit card tokenization IFRAME was displayed.
The hpci3DSitePINSuccessHandler present in the header section is called once the PIN verification is complete. This handler should initiate the resubmission of the form, this handler can be customized to do any other validation prior to submission if required.
<form id="CCAcceptForm" action="https://somepath/MainEcommerceAction" method="post"><input id="ccNum" name="ccNum" type="hidden" value=" " /> <input id="ccCVV" name="ccCVV" type="hidden" value=" " /> <input id="ccBIN" name="ccBIN" type="hidden" value=" " /> <input name="action3DSec" type="hidden" value="verifyenroll" /> <input type="submit" value="Submit" onClick='return sendHPCIMsg();' /></form>
Required parameters to be sent back to HostedPCI (3D Secure only)
Once 3D Secure information has been validated inside the 3D Secure iFrame, the following parameters must be returned back to HPCI:
- pxyThreeDSecAuth.actionName – must contain “verifyresp”.
- pxyThreeDSecAuth.authTxnId – contains authTxnId that was received from HPCI in the previous call.
- pxyThreeDSecAuth.authSignComboList[0] – optional, for example “YY”.
- pxyThreeDSecAuth.authSignComboList[1] – optional, for example “AY”.
- pxyThreeDSecAuth.authSignComboList[2] – optional, for example “UY”.